
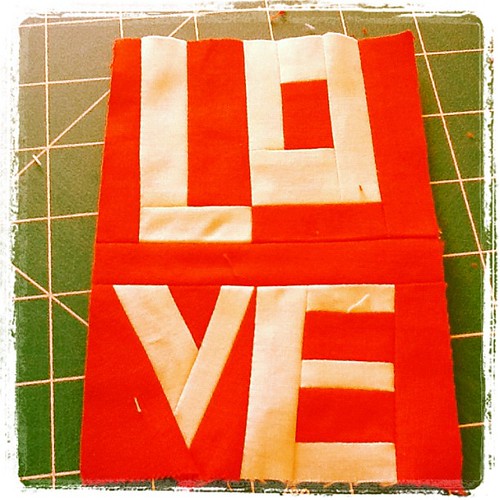
Pick a letter fabric, and a background fabric. In my observation, using solids is the easiest. If you use a print, try to use one that has a small design, and also not too busy. If the prints coordinate too closely, it may be hard to read the word. In this case, I'm using red for the background, and white for the letters. I use a ruler from June Tailor called a Shape Cut. I cut 1 inch and 1.5 inch strips before I get started. Occasionally you do need wider pieces (as in the V below), but this will get you started.

A word of caution when using this ruler. Take your time when using it. Pay attention to where you place your hand in order to hold the ruler. Imagine this pencil might be your finger. Things could get a little- dicey (pause for audience laughter).


Piecing letters is easier than you might think. Before we start, I want to put forth a tip that'll save you some grief. Set your stitch length short. It needn't be this small, but after my first few words fell apart in the wash, I made it a habit to set it low when I sit to join my strips.

Now, get one of each of your strips and stitch them together. Press the seams open. Open? Does it matter? Well, I really think it does, and I'll tell you why. Pressing the seams open keeps it looking flat. If you press your seams to the darker fabric, in this case the red, the bulk of the pressed seam would cause the background to appear raised. In instances where the letter fabric is the darker fabric, the letter would appear raised. However you decide to press your letters, choose a way and stick to it. But don't skip pressing.

Add the bottom piece to construct the letter "L". If you want to make your letters wonky, trim at angles before adding the bottom piece.

For the O, cut a piece of the background fabric and build your "o" around it. You can be really creative with this letter. It doesn't need to be as boring as this one. It may be hard to imagine, but this is one of those letters you can make your own by changing your trimming angles, and using different width of letter fabrics.

The V is my favorite letter. Once you can make the V, you can make the W, and Y. The W is two Vs placed together, and the Y is the V with a stick on it. I like my Vs pointy bottomed, and it is my pleasure to show you how to achieve this look.

Put a piece of wide background fabric with one of your wider letter strips. Also sew together thin pieces of each of the fabrics.

Eyeball the strips to decide on the angle that you like best. Cut your strip on this angle.

This is where your point comes in. Resist the urge to attach these pieces at the bottom. Offset it so that when you sew the pieces together, press it, open it, and trim it, that the letter will come to a point. If not, you'll get a flat bottomed v.

Add another piece of background fabric. As wide as you can stand it, you can always trim it down later.
I tend to make the most of my fabric. Meaning, I dig through the pieces I've trimmed in order to construct easier letters. The E is one of these easiest with which to do this (also the lowercase l).

Can you see it? I joined these three pieces together, and then added an unused letter fabric in order to make this E.

This is where you get to play. Arrange your letters. You might want to save trimming your letters until you get to this point. As it concerns anything, practice makes perfect, and I for one need a lot more practice, but through some trial and lots of errors, I've found my way to piece letters. That's the best thing about liberated, improv, free, unruly- or whatever you call- style of piecing. There is no right or wrong way. There's no need for the size of your letters to be uniform. When you're first piecing, you might want to try making larger letters before trying smaller letters.

So, I hope I've hooked you enough to want to make some more letters. There are plenty of resources which you may use. Word Play Quilts: Easy Techniques from the UnRuly Quilter
5 comments:
Thank you!
I've always wanted to try letters - you make it seem so easy!
Thanks for sharing over at mme Samm's today, Manda. Totally adore this tut and really appreciate your time in sharing it.
Hi Manda, I found you by way of Sew We Quilt. Great tut! I've had that book for quite some time but didn't think making the letters was as easy as they say. But after seeing your tut I'm ready to dive right into this! Thanks! I'm a new follower of yours now too!
Letters are always a challenge. This is SEW unique and special. Thanks for sharing your technique.
These are so cute!! I'll have to give them a try :)
Wanted to let you know that I passted the Liebster Award on to you this week! See it here:
http://www.kelseysews.blogspot.com/2012/02/wip-wednesday-2-22-12.html
Post a Comment